Pilates Reformer Assembly Instructions – A Complete Guide for Users
In this detailed guide, we will walk you through the assembly process of your Reeplex Luna Series Pilates Reformer. Whether setting up this versatile fitness machine for the first time or needing a refresher, our step-by-step instructions will ensure you get it right. Let’s dive in and get your Luna Reformer Pilates Equipment ready to transform your fitness journey.
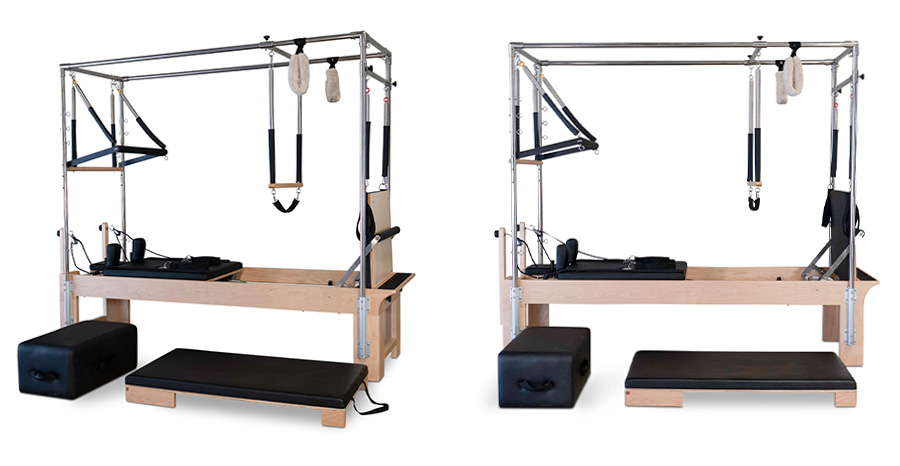
Unpacking Your Reeplex Luna Series Reformer
Before assembling your Reeplex Luna Series Reformer pilates equipment, ensure you have all the components. The professional studio package includes:
- One frame (preassembled)
- One carriage
- One sitting box
- One standing platform
- One foot bar
- One jump board
- Two pulley risers
- Two shoulder rests
- Accessory kit (two ropes, two double loops, two soft loop handles, one-foot strap)
Step-By-Step User Guide to Assemble Your Reformer Pilates
Step 1: Attaching the Foot Bar
- Position the Foot Bar: Begin by attaching the foot bar to the frame. Press down on the lever to disengage the locking mechanism.
- Align and Secure: Align the foot bar with one of the position points. Once aligned, the lever will lock into place to ensure safety.
- Insert the Screws: Insert the screw through the center hole where the bar pivots and hand-tighten it.
- Tighten Both Sides: Repeat the process on the other side and then tighten both screws with the provided Allen key.
Step 2: Installing the Pulley Risers
- Align the Pulley Risers: Ensure the pulley is facing toward the reformer and line up the screws to the holes on the frame.
- Secure the Bolts: Insert the washer and nut to secure the bolts into place and repeat on the second riser.
- Tighten the Bolts: Using the provided tools, tighten each bolt and ensure the risers are firmly secured to the frame.
Step 3: Placing the Carriage
- Position the Carriage: Place the carriage inside the frame, ensuring the wheels ride on the railings.
- Install the Shoulder Rests: Insert the shoulder rests into the carriage and fasten each post by inserting the bolt from the bottom and screwing the posts in.
Step 4: Assembling the Accessories
- Ropes and Double Loop Handles: Take the rope and thread it through the pulley from the top. Place the looped end on the storage posts and thread the other end through the Rope Adjustment System.
- Securing the Ropes: Pull one of the adjusters outwards to allow the rope to enter. Attach the rope to the double loop handles by taking the looped end of the rope and inserting it from the bottom. Insert the strap through the looped end and pull tight to secure it.
- Foot Strap: Attach the foot strap by unlocking the carabiner and attaching the hooks to the frame.
Step 5: Installing the Jump Board
- Position the Jump Board: Simply insert the jump board directly into the post sleeves on the footbar side of the reformer.
See Our YouTube Video
The assembly video offers a step-by-step guide to installing the new Reeplex Luna Series Pilates Reformer Australia. Watch Now on our YouTube channel.
Instructions for Successful Pilates Reformer Assembly
- Follow Instructions Carefully: Read through each step before you begin, and make sure you understand the process.
- Organize Your Tools and Parts: Keep all the parts and tools organized for easy access during assembly.
- Double-Check Tightness: Ensure all bolts and screws are tightened properly to avoid any instability.
- Ask for Help if Needed: Some parts might be easier to install with an extra pair of hands, so don’t hesitate to ask for assistance.
Maintenance and Care
Once your Reeplex Luna Series Reformer is assembled, it’s essential to maintain it properly to ensure longevity and optimal performance. Here are some maintenance tips:
- Regular Cleaning: Wipe down the frame, carriage, and accessories after each use to prevent sweat and dirt buildup.
- Check for Wear and Tear: Regularly inspect the ropes, handles, and foot strap for any signs of wear and replace them if necessary.
- Lubricate Moving Parts: Apply a suitable lubricant to the wheels and railings periodically to keep the movements smooth.
Benefits of the Reeplex Luna Series Reformer
The Reeplex Luna Series Reformer is a versatile and high-quality piece of fitness equipment that offers numerous benefits:
- Full-Body Workout: Engage multiple muscle groups and improve strength, flexibility, and balance.
- Low-Impact Exercise: Ideal for all fitness levels, providing a low-impact workout that is gentle on the joints.
- Customizable Resistance: Adjust the resistance levels to suit your fitness goals and progress over time.
- Compact Design: The Luna Reformer’s compact design makes it suitable for home gyms and small spaces.
Why Choose Dynamo Fitness Equipment?
At Dynamo Fitness Equipment, we are committed to providing top-quality fitness products that meet your needs. Here’s why you should choose us:
- Extensive Range of Products: From home gyms to commercial fitness equipment, we have everything you need.
- Expert Advice: Our knowledgeable staff can help you choose the right equipment for your fitness goals.
- Exceptional Customer Service: We pride ourselves on delivering excellent customer service and support.
Conclusion
Assembling your Pilates Reformer Machine can be a straightforward and rewarding process when you follow these steps. With this assembly guide, you’ll have your reformer set up and ready to use in no time, allowing you to enjoy a comprehensive and effective pilates reformer workout in the comfort of your home.
For more information on our range of fitness equipment, explore our online store or visit our showrooms in Melbourne, Sydney, Adelaide, and gym equipment Perth today. Transform your fitness journey with the Reeplex Luna Series Reformer and experience the benefits of a versatile, high-quality workout machine. Contact our team today.